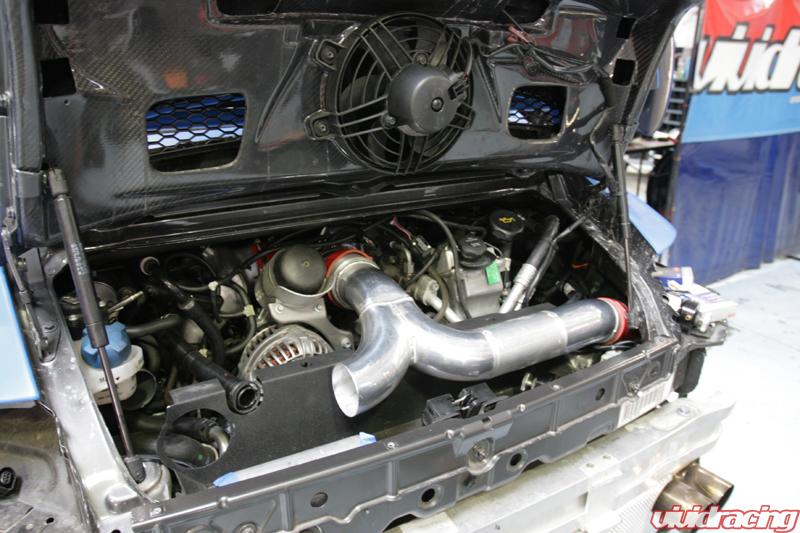
So we are trying to finalize some mods for the Texas Mile and continue our 800HP beast. We have removed our Agency Power Cold Air Intake and are redesigning our Ypipe to be 3 inch all the way from the intercoolers to the upgraded throttle body and plenum. Before our YPipe necked down which really was not condusive to flow. Since we are changing the Ypipe design, we will also need to relocate our intakes. Much like you have seen on other cars, we have opted to run short elbows and put our filters/MAF where the intercoolers are. To make sure we keep the cool air flowing through the duct work, we have notched the plastic housing to house the K&N filters as well.
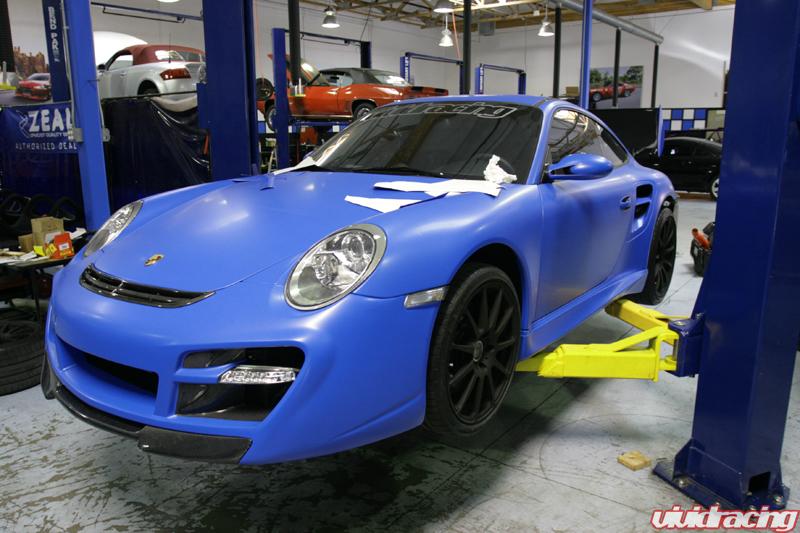
I should have updated pictures and more info by the weeks end. Oh yeah, to drive people crazy, we wrapped the car FLAT BLUE!
Check out the original Project 997TT Section Here.

Looks sick, Would look pretty cool with some shinny 20’s
Finishing up the car. Going to powdercoat the pipes, but here it is raw form. We have made the Ypipe straight 3" from the intercooler endtank to the throttle body. The intakes are now in the intercooler ducting for better/cooler air. We also have our silicone BOV return hoses in place.
We cut up our carbon air box to fit over the ypipe so when you close the decklid, it will look semi stock and the factory snorkels will keep cool air on to the pipes.
Installing the new Textured Black HRE P40 wheels today, new pics coming soon.
Just added the HRE P40 wheels in flat black. Not sure how I feel about them, but the car is looking pretty crazy! I always wanted an over the top look, so here it is. Comments?
When you say "wrapped" do you mean wrapped in flat blue plastic or the car was sprayed with flat blue paint?
Looks insane. Nice work.
Looks good, like it better with P40.
It is wrapped in vinyl.
Thanks Greg!
Great idea! I like that.
How’s the pricing on something like that?
$2500 to wrap a car.
It looks better in person. Not to say it looks bad in the pics.
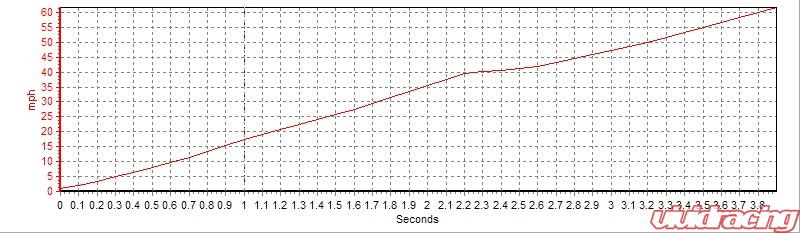
Just hit the dyno today. Did 3 runs. First one the intercooler hose popped off and it made 600awhp. 2nd run did 697awhp. 3rd and final run did 756awhp. We are running this on a Mustang ALL WHEEL DRIVE Dyno with a parasitic multiplier of 1.0. Temp was 82F and we were running a max of 1.5bar on 109octane. You can see the screen shot showing the power… Drag times and 60-130 times coming on Friday night, posting saturday.
[tube]https://www.youtube.com/watch?v=3nAVhKm_TKw[/tube]
The dyno plot shows a dotted line and solid line. The dotted line is our runs before the new 3inch Ypipe, Agency Power Throttle Body/Plenum Upgrade, and Cold Air Intake System. You can see that once the turbos kicked in at 3600rpm, the car pulled MUCH stronger to redline with the new setup. Questions, comments, let me know.
Dope.
That’s a lot of horsepowers.
Just saw an article on Top Speed about the 977TT… Great work guys, Keep it up. You continue to set quality standards !!
Where is this article? Link me.
nevermind found it! Porsche 997 Twin-Turbo by Vividracing – Top Speed
Took the car drag racing. Was a beautiful 80F. I have the perfect car, great weather, and I suck at launching car… Driver Wanted!
Best ET was 11.16. Best Trap was 134.37mph. At 135mph they kick you off unless you have a NHRA license. Comparing times on this site and DragTimes.com, this is a 10.60 car. Soon… Enjoy the video montage.
[tube]https://www.youtube.com/watch?v=5zRMK-p8tWk[/tube]
I also got some PBox numbers. Not excited, but they are decent considering I have never done this before. I expect a faster 60-130mph. I need advice on gear to start in etc. 0-60 and 0-100mph were good expect the terrible launches.
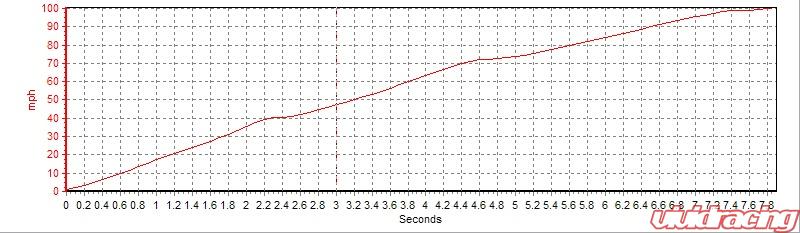
0-60mph – 3.76sec. Goal is 3.5sec
0-100mph – No Goal
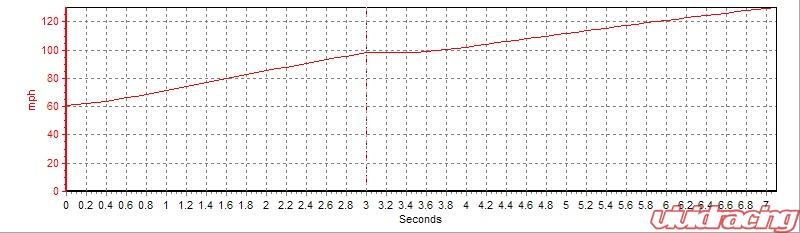
60-130mph – 7.14sec. Goal is 6.50sec
Is that you squealing tires? Did you not hit the burnout box? Unless things have changed in the few years since I was there last, Speedworld’s track is always prepped like shit too. Maybe hit Firebird one time and see if you can hook up any better?
Ummmmmmmm….i dont think so!
Car is sick keep it up vivid!
Just got back from the Texas Mile and ran a 196mph. Not bad. We had a bad mix of 100/109 octane, our boost would level off at 1.3 instead of 1.5, and our water/meth kit had the wrong mixture. As well, our rear bumper was like a parachute… So we definitely learned alot from this event. Check out the video we did here –
YouTube – Texas Mile 2009 Fastest Porsche 997 Turbo
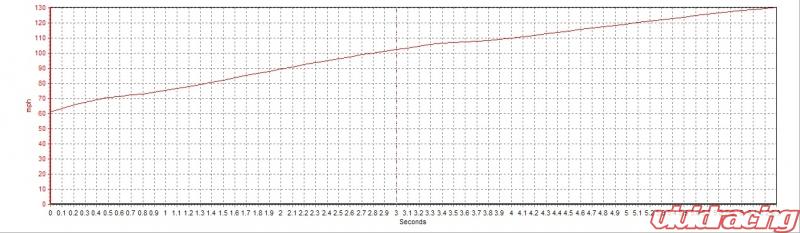
The car ran some pretty impressive times as well. It did a 60-130mph run in 6.33 seconds and a 0-60mph in 3.5 seconds. See the Performance Box times below –
60-130 run
0-60 run

So after 10 months of R&D we released the VR825 Kit as seen here. You have just made the amazing choice to install this kit on your Porsche 997 Turbo. But with all these parts, how do you get them in? Well, here is some help 🙂
Intro:
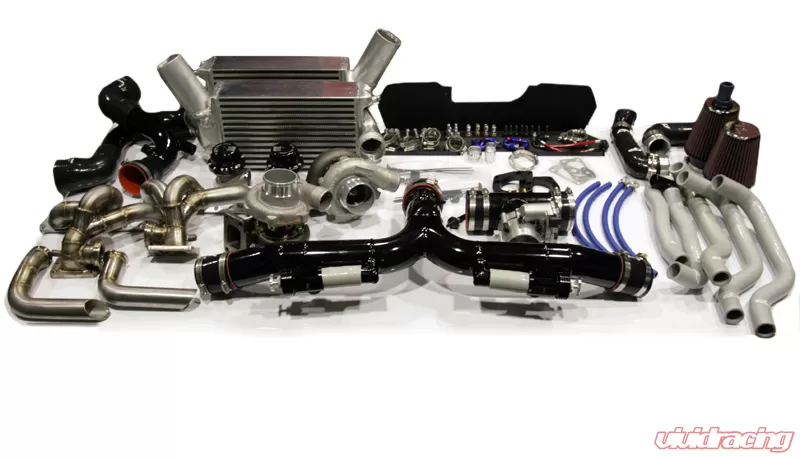
The VR825 Kit comes with ALOT of parts needed to do the installation. Instead of doing a step by step, we are going to break this up into sections. Here is the complete kit laid out.
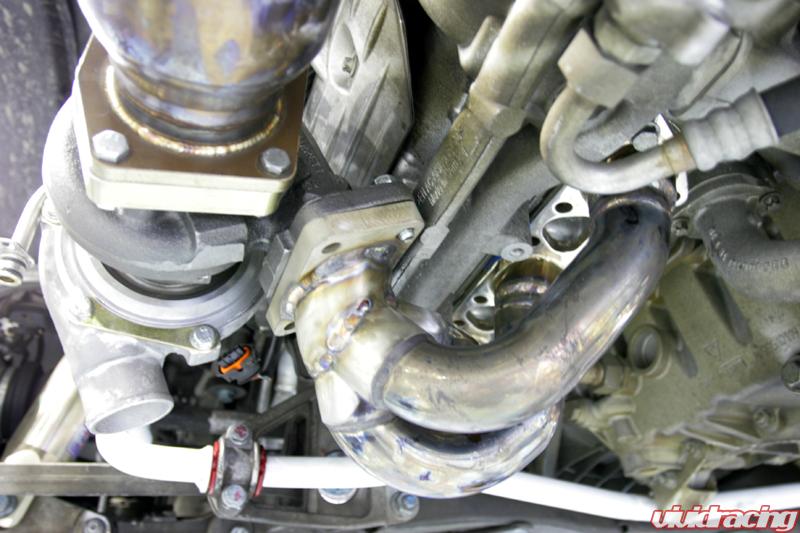
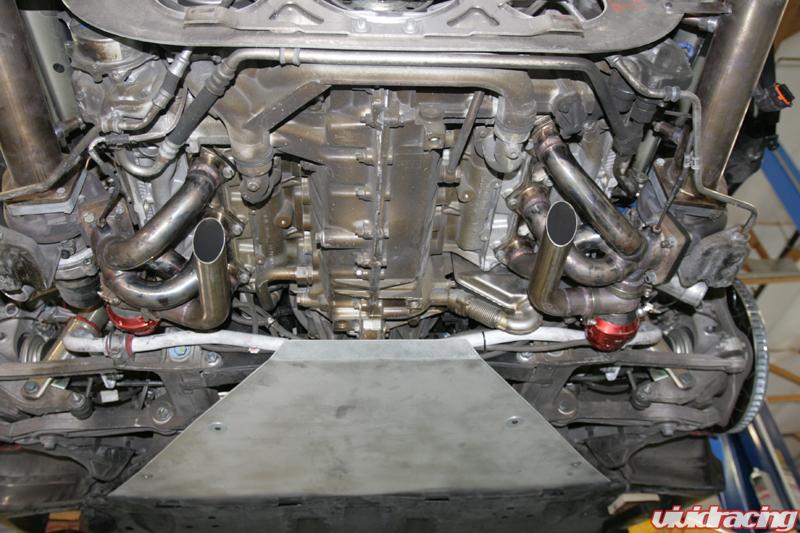
Turbo/Header Section:
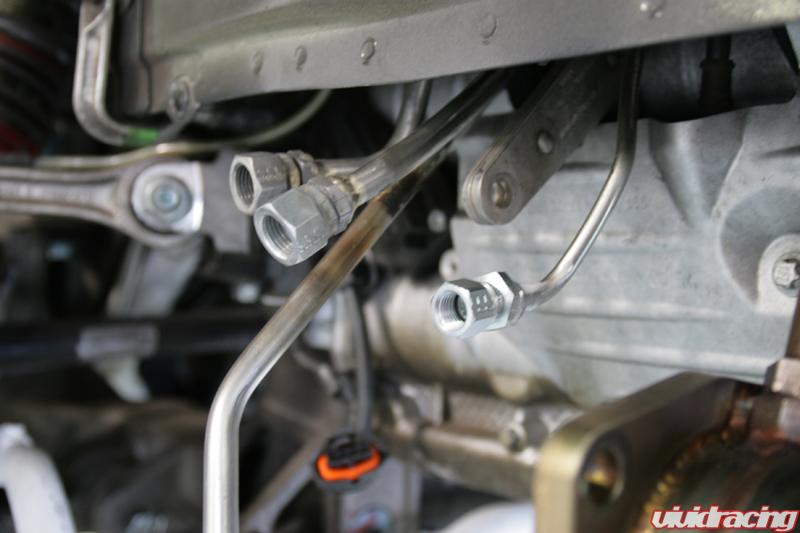
The kit is supplied with Garrett GT3076rs Ball Bearing Turbos and components to install the kit. The first step is to obviously remove all the OEM components on the vehicle. With the car turboless, the first step in this process is to cut off the factory Porsche fittings and install the new Oil and Waterline fittings supplied. These fittings have to be "brazed" on. Torch and Solder does the trick.
Once these fittings are on and in place, it is time to mount the turbos. Using the Agency Power stainless steel Garrett headers, mount them to the engine block. You can now mount the 4bolt flange to the turbo which will support it for existing work. Connect the exhaust flange to the hot side with the supplied parts and then connect the new oil and water lines with fittings to the turbo. You will need to take the OEM cast oil tank and drill out the mounting holes to fit to the Garrett turbo. You can slot these on a drill press if need be. Once done, the oil tank will bolt to the turbo with the existing O-ring. After you have mounted everything, then you can connect the Tial 44mm wastegates and dump tubes with the provided band clamps.

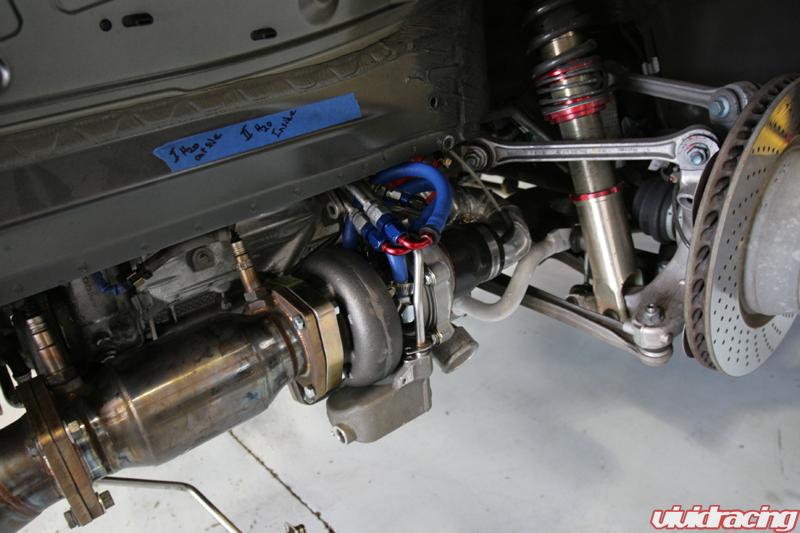
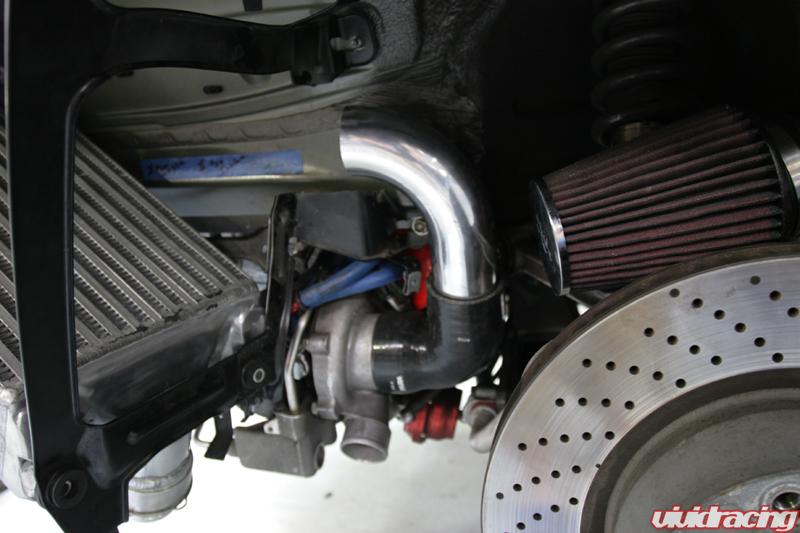
Intercoolers and Intakes:
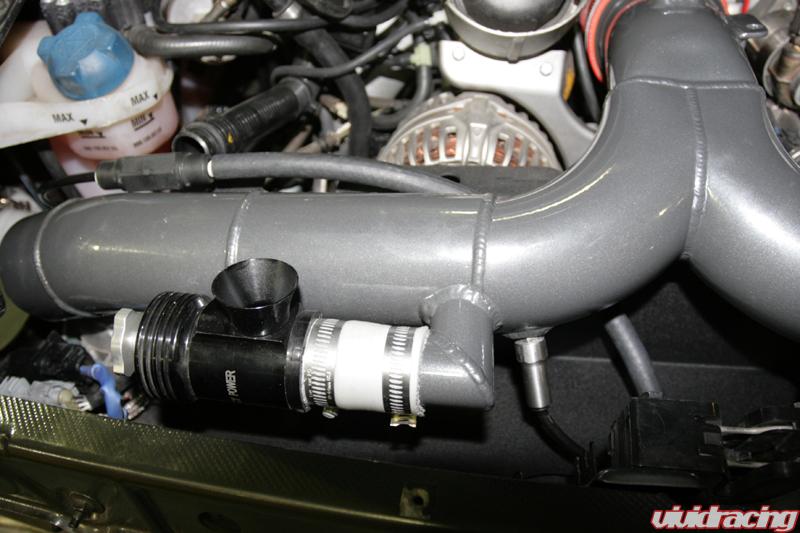
The intercoolers will be the biggest job of this installation. This will require modification to the factory aluminum bracket and trimming of the inner fender pass-throw holes. The Agency Power bar and plate intercoolers feature a full 3inch extenstion to the Ypipe. In order to fit properly, you must ovalize the hole towards the front of the car where the factory boost hose goes in. You will also need to drill a 1.5 inch hole for the silicone recirculation tube to go through. With the ducts and frames off of the car, trim the frames as you see the blue tape marked. You will also need to cut the snap attachments off of the black plastic housing and use the provided connecting ties to secure the ducting to the intercoolers.
Once you have the intercooler assembly put together, do a dry run of attaching the intercoolers loosely to the car. You will need to then attach the intake pipes and mark where to cut the holes for the intakes. Attach the provided 90 degree silicone bend to the turbo compressor side and then insert the Agency Power aluminum intake pipe. This pipe will sit with the factory MAF sensor mount connected to it and on the other side in the ducting, the K&N filter.
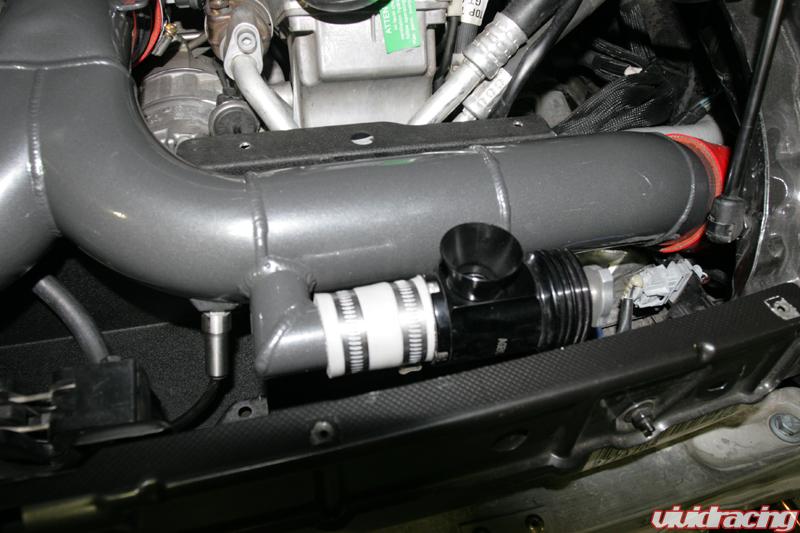
Now mark on the plastic where to cut and remove the intercooler assembly off to cut your hole in the ducting. This keeps the functionality of directing air flow to the intercoolers and filters efficient.
Once you cut finish cutting the intercooler ducting to size, reinstall the intercooler assemblies and connect the intake pipe, MAF, and Filter to ensure it fits in the hole correctly.
Now attaching the silicone BOV return tube to the intake, run these through the 1.5inch hole you have cut and into the engine bay. Mock the fender liner in place and trim around each intake part as pictured.
Make sure to secure all provided clamps, tabs, and bolts back to the car. You can now begin to work on the engine bay portion.
Engine Bay:
The engine bay without the stock intake and y-pipe is quite spacious. First thing you need to do is to remove your stock intake plenum and throttle body. You will be replacing it with the new Agency Power Race Plenum and Throttle Body which is a direct OEM replacement. Make sure to connect all breather and vacuum hoses and have each each clamp secure and in place. Dont forget to plug in the sensor on the throttle body.
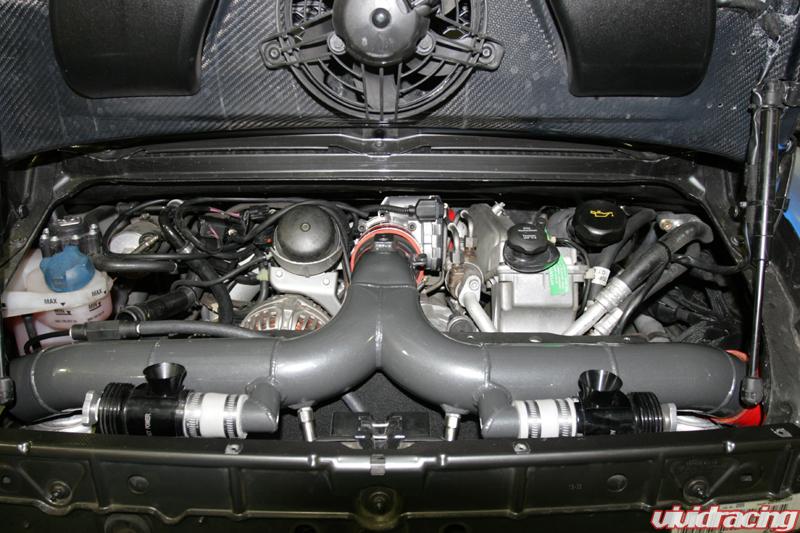
Once the plenum is installed, it is now time to install the Y-Pipe. The full 3 inch Ypipe fits to the throttle body with the provided coupler. Each end attaches to the extended intercooler pipe with the provided silicone couplers.

2 Provided Agency Power adjustable blow off valves are mounted with silicone coupler to the y-pipe. Each one of the BOV return silicone tubes coming from the intake pipe are attached to the recirculating port of the blow off valve. Once this is all attached, tighten down clamps and plug in the factory MAP sensor on the top of the y-pipe. You will also notice that near the top of the y-pipe is a mount for the needed electronic boost control solenoid. We prefer to use the Greddy unit. You will need to run vacuum lines from wastegates to the EBC solenoid and then to a pressure source. The BOV’s also must have a vacuum source.
Once the y-pipe is finished, check all your clamps, fittings, and hoses for a secure fit. The only way to tell for leaks is once the car is started or a pressure test done. With everything fitted back to the car you can now reattach your exhaust system, O2 sensors, and verify all your connections. Follow the exact installation instructions for external wastegates provided with your boost controller. Your exposed VTG connections can be taped up and ziptied out of the way from melting near the cats. Before you put any oil in the car, let the car come up to temperature and check the level. You want to be careful not to overfill it or you will blow the center cartridge of the Garrett Turbo. After verifying this, add the necessary oil and coolant to the car. Make sure your boost controller is reading good vacuum of about -0.50 to -0.70.
Once all the mechanical parts are checked and verified, you will need to flash your car with our proprietary VTG delete GT30 ECU Tune. This is done with the VRTuned Flash Cable and following the instructions here – http://www.VRTuned.com/installation. Once the car is flashed and complete, reinstall the rear bumper cover and take the car for a test drive around the block. Make sure everything sounds and feels good. With the appropriate boost settings (Greddy: 20%, 0.9, 1.4, 15%) crank your boost up till it makes about 1.3bar of boost steady and you are ready to fly!
View more pictures of the installation items on our gallery here – Vivid Racing – Vivid Racing Gallery – Project 997TT